
Basic Crepe Recipe
I absolutely adore this recipe because making crepes fills my kitchen with such a cozy, nostalgic vibe and gives me that perfect Instagram-worthy breakfast moment. Plus, it’s so versatile; I can go from sweet to savory in a heartbeat depending on my mood!

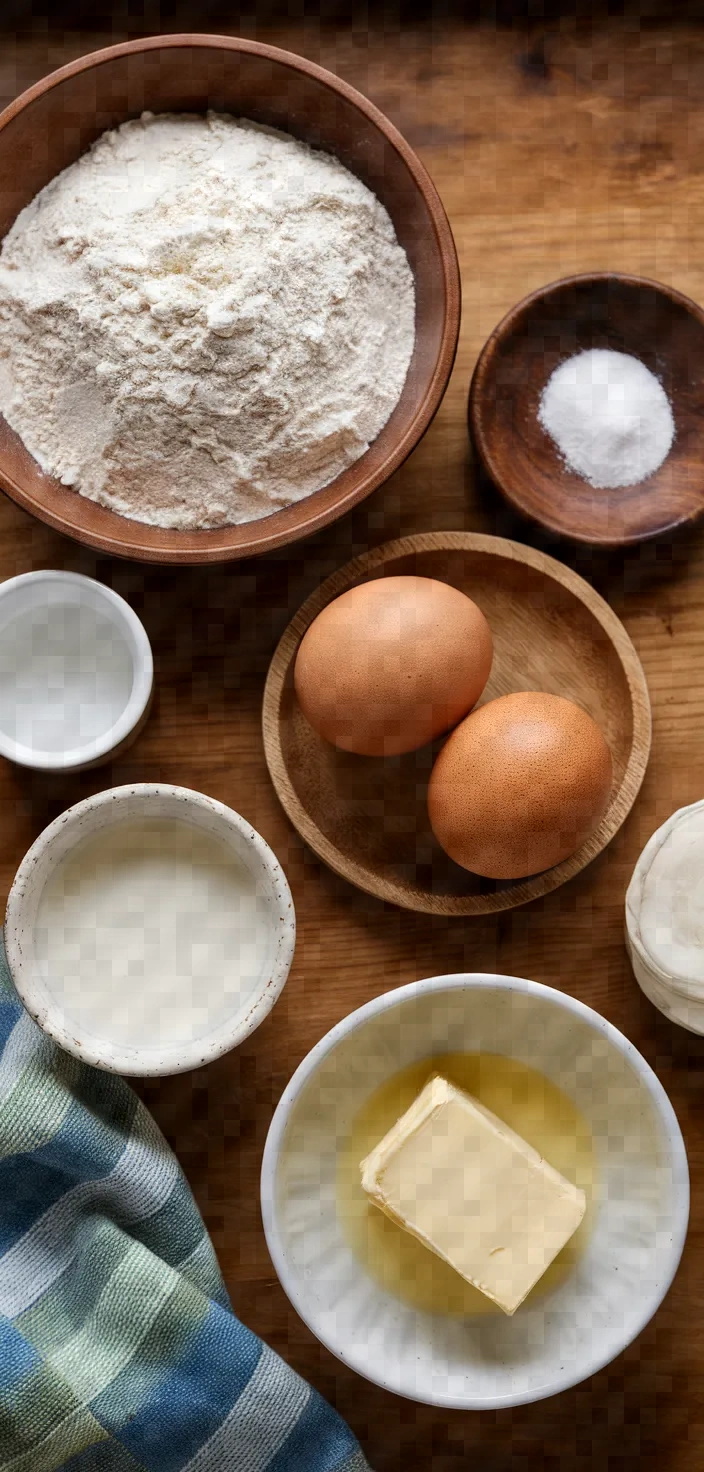
Crepes are not only simple and adaptable but also delightful. By using just 1 cup of all-purpose flour, 2 large eggs, and a mixture of 1/2 cup milk and 1/2 cup water, you can make crepes that are equally good as a sweet breakfast or a savory lunch.
My addition of 2 tablespoons melted butter gives the crepes a lovely richness. And if you don’t think a dash of salt is important, you should know that it truly enhances the flavors.
Ingredients
All-Purpose Flour:
Principal source of carbs; provides frame.
Eggs:
Rich in protein; help in holding together components.
Milk:
Contributes richness; supplies calcium and vitamins.
Butter:
Provides taste; contributes to juiciness and succulence.
Salt:
Improves taste; levels sweetness.
Ingredient Quantities
- 1 cup all-purpose flour
- 2 large eggs
- 1/2 cup milk
- 1/2 cup water
- 1/4 teaspoon salt
- 2 tablespoons unsalted butter, melted
Instructions
1. In a large mixing bowl, combine the flour and salt. Whisk together until well mixed.
2. Incorporating the eggs into the flour mixture requires a light hand and some patience, or else your batter will be lumpy. It took me a few tries to figure out the best way to add the eggs and beat them in.
3. Slowly add the milk and water, while whisking, until the mixture has a smooth, lump-free consistency.
4. Combine the melted butter with the other ingredients. Whisk the mixture until it is fully united and slightly watery.
5. A non-stick skillet or crepe pan should be preheated over medium-high heat.
6. Apply a thin layer of grease to the pan, using either butter or cooking spray.
7. Approximately 1/4 cup of batter should be poured onto the center of the pan, which should then be tilted in a circular motion to spread the batter evenly.
8. Prepare the crepe for about one to two minutes; wait until the edges begin to lift and the underside appears slightly golden before attempting to flip it.
9. Using a spatula, deftly turn the crepe over and allow the second side to cook for about 1 minute, or until it turns a shade or two darker than the first side.
10. Place the finished crepe on a plate, and keep going with the remaining batter, piling the crepes onto the plate. They are good warm, and the fillings/toppings can be sweet or savory: both types are delicious in their own way, and they offer a wide range of potential, as shown in the next section.
Equipment Needed
1. Large mixing bowl
2. Whisk
3. Measuring cups
4. Measuring spoons
5. Non-stick skillet or crepe pan
6. Cooking spray or pastry brush (for applying butter)
7. Spatula
8. Plate for stacking crepes
FAQ
- Q: Can I make the crepe batter ahead of time?Yes, the batter can be prepared up to 24 hours ahead of time. Simply refrigerate it and stir thoroughly before using.
- Q: What’s the best way to avoid lumps in the crepe batter?A: Before combining the flour with the wet ingredients, it should be sifted, say the authors of Baking Basics and Joy of Baking. After the sifted flour is added, it should be whisked together with the other ingredients.
- Q: How thin should I spread the crepe batter in the pan?To create a uniformly thin layer of batter in the pan, tilt the pan and swirl the batter so that it can quickly and easily cover the bottom of the pan.
- Q: What type of pan is best for making crepes?A non-stick skillet or a pane de crepes works best for flipping crepes easy-peasy.
- Q: Can I use oil instead of butter in the recipe?Q: Can you substitute oil for melted butter, and if so, how?
A: Yes, you can substitute oil for melted butter. Use an equal amount of a neutral oil like vegetable or canola.
- Q: How should I store leftover crepes?Q: Crepes can be stored in an airtight container in the refrigerator for up to 2 days. To keep them from sticking together, place sheets of parchment paper in between the crepes.
- Q: Can I freeze crepes?You can freeze crepes for up to 2 months. Each crepe should be separated by parchment paper and placed in a freezer-safe bag.
Substitutions and Variations
All-purpose flour: Substitute with 1 cup of whole wheat flour or 1 cup of gluten-free flour blend for a gluten-free version.
Cow’s Milk: Substitute with 1/2 cup of almond milk, soy milk, or oat milk for a non-dairy option.
Water: For a creamier texture, add an extra 1/2 cup of water or a water alternative.
Butter (unsalted): For a dairy-free alternative, replace with 2 tablespoons coconut oil or olive oil.
Pro Tips
1. Rest the Batter After mixing the batter, let it rest in the refrigerator for at least 30 minutes. This allows the flour to fully hydrate and the bubbles to subside, resulting in smoother, more tender crepes.
2. Consistent Heat Ensure that your skillet or crepe pan is consistently heated. Adjust the heat as necessary between crepes to maintain even cooking and prevent burning.
3. Test Crepe Use the first crepe as a test to adjust the consistency of your batter and the heat of your pan. Add a little water or milk if the batter seems too thick for spreading.
4. Light Grease Layer Apply only a very light layer of butter or cooking spray before each crepe. Too much grease can cause the crepes to become soggy or greasy.
5. Thin and even Spread Pour the batter into the pan slowly, then immediately tilt and rotate the pan in a circular motion to achieve a thin, even layer that covers the entire bottom quickly.

Basic Crepe Recipe
My favorite Basic Crepe Recipe
Equipment Needed:
1. Large mixing bowl
2. Whisk
3. Measuring cups
4. Measuring spoons
5. Non-stick skillet or crepe pan
6. Cooking spray or pastry brush (for applying butter)
7. Spatula
8. Plate for stacking crepes
Ingredients:
- 1 cup all-purpose flour
- 2 large eggs
- 1/2 cup milk
- 1/2 cup water
- 1/4 teaspoon salt
- 2 tablespoons unsalted butter, melted
Instructions:
1. In a large mixing bowl, combine the flour and salt. Whisk together until well mixed.
2. Incorporating the eggs into the flour mixture requires a light hand and some patience, or else your batter will be lumpy. It took me a few tries to figure out the best way to add the eggs and beat them in.
3. Slowly add the milk and water, while whisking, until the mixture has a smooth, lump-free consistency.
4. Combine the melted butter with the other ingredients. Whisk the mixture until it is fully united and slightly watery.
5. A non-stick skillet or crepe pan should be preheated over medium-high heat.
6. Apply a thin layer of grease to the pan, using either butter or cooking spray.
7. Approximately 1/4 cup of batter should be poured onto the center of the pan, which should then be tilted in a circular motion to spread the batter evenly.
8. Prepare the crepe for about one to two minutes; wait until the edges begin to lift and the underside appears slightly golden before attempting to flip it.
9. Using a spatula, deftly turn the crepe over and allow the second side to cook for about 1 minute, or until it turns a shade or two darker than the first side.
10. Place the finished crepe on a plate, and keep going with the remaining batter, piling the crepes onto the plate. They are good warm, and the fillings/toppings can be sweet or savory: both types are delicious in their own way, and they offer a wide range of potential, as shown in the next section.